In this Arduino Tutorial we will learn how to use the HC-SR04 Ultrasonic Sensor to activate the Airpump, driven by a transistor.
Airpump
use of a Transistor
The Arduino pins are strong enough to light small LEDs (up to 40 milliAmps), but they're not strong enough to run motors and other power-hungry parts. (The motor in the airpump needs 50-100mA). Because the motor needs more current than an Arduino pin can provide, we'll use a transistor to do the heavy lifting. A transistor is a solid-state switch. When we give it a small amount of current, it can switch a much larger current. The used transistor (2N2222) can switch up to 200mA.
connecting it to the board
The transistor has three pins. Looking at the flat side with the pins down, the order is collector, base, emitter. You connect the black wire on the motor to the collector pin on the transistor, the base pin through a 330 Ohm resistor to the digital pin that gives a signal to control the transistor (in this case pin3), and the emitter pin to GND. All this is shown in the circuit diagram.
safety system: flyback diode
When the motor is spinning and suddenly turned off, the magnetic field inside it collapses, generating a voltage spike. This can damage the transistor. To prevent this, we use a "flyback diode", which diverts the voltage spike "around" the transistor.
coding
To create the illusion of Daria breathing, we want to start and stop the breathing with a acceleration/deceleration. The code explains how to do this.
Ultrasonic Sensor
The sensor emits an ultrasound at 40 000 Hz which travels through the air and if there is an object or obstacle on its path It will bounce back to the module. Considering the travel time and the speed of the sound you can calculate the distance.
For example, if the object is 10 cm away from the sensor, and the speed of the sound is 340 m/s or 0.034 cm/µs the sound wave will need to travel about 294 u seconds. But what you will get from the Echo pin will be double that number because the sound wave needs to travel forward and bounce backward. So in order to get the distance in cm we need to multiply the received travel time value from the echo pin by 0.034 and divide it by 2.
speed of sound (v) = 340 m/s = 0,034 cm/µs
2 * distance (s) = time (t) / speed (v)
= t * 0,034
distance (s) = t * 0.034 / 2
connecting it to the board
The HC-SR04 Ultrasonic Module has 4 pins, Ground, VCC, Trig and Echo. The Ground and the VCC pins of the module needs to be connected to the Ground and the 5 volts pins on the Arduino Board respectively and the trig and echo pins to any Digital I/O pin on the Arduino Board, as shown in the circuit diagram.
CIRCUIT DIAGRAM
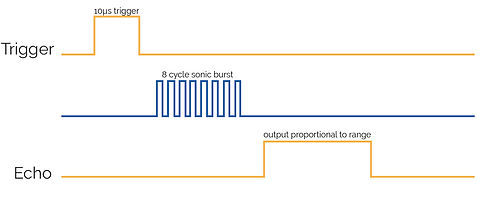
In order to generate the ultrasound you first need to clear the Trig and than put it on a High State for 10 µs. That will send out an 8 cycle sonic burst which will travel at the speed sound and it will be received in the Echo pin. The Echo pin will output the time in microseconds the sound wave traveled.
In the loop first you have to make sure that the trigPin is clear so you have to set that pin on a LOW State for just 2 µs. Now for generating the Ultra sound wave we have to set the trigPin on HIGH State for 10 µs. Using the pulseIn() function you have to read the travel time and put that value into the variable “duration”. This function has 2 parameters, the first one is the name of the echo pin and for the second one you can write either HIGH or LOW. In this case, HIGH means that the pulsIn() function will wait for the pin to go HIGH caused by the bounced sound wave and it will start timing, then it will wait for the pin to go LOW when the sound wave will end which will stop the timing. At the end the function will return the length of the pulse in microseconds. For getting the distance we will multiply the duration by 0.034 and divide it by 2 as we explained this equation previously.
code
explaining arduino